This is a followup post from my original Darter Pro review.
The concept of dual-booting a computer is not new. Apple devices have had Bootcamp as an option to run both macOS and Windows natively from the same drive. In the late 90's I had Windows 98 and Linux partitions ready to boot at all times. The technology has been available a long time. However, SECURE dual-booting needs discussed more.
By default, a MacBook Pro with Bootcamp running Windows offers two isolated operating systems on one drive. You can choose which to load upon a reboot. Each operating system has its own partition on the overall drive and neither are encrypted by default. You could dual-boot a Windows computer to launch Linux from a separate partition just as easily. However, encryption can cause issues.
While it is possible to encrypt two systems within the same drive, it is problematic. We like to have true FULL-DISK encryption which makes the entire drive readable by only one system. There are tweaks which can allow for two PARTITION-ENCRYPTED systems within the same drive, but there will always be minor security sacrifices. This is where the new Darter Pro (and any other laptop with dual NVMe ports) provides a much better solution. You can add a second internal NVMe drive in order to possess two isolated systems, each with true full-disk encryption. The following are the steps I took to possess two secure versions of Pop!_OS on my machine, and encrypted Pop!_OS along with encrypted Windows 11 for a client.
First, I needed a second NVMe drive. I chose the Crucial 1 TB P3 Plus (https://amzn.to/4aC5vfC) for $69. However, I could have also just ordered a second drive from System76 and saved the headache. They would have installed it for me.
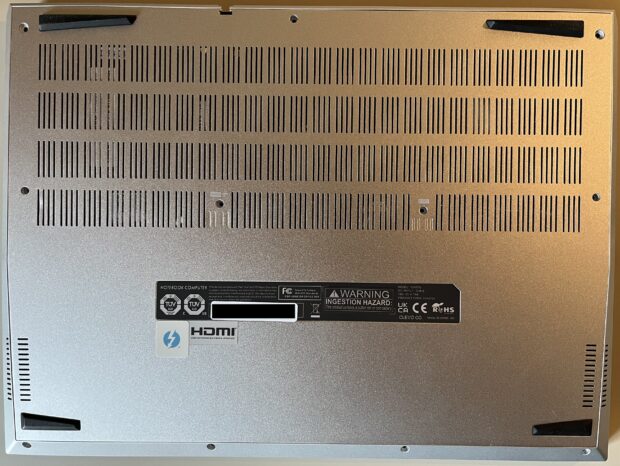
Next, I needed to open my new Darter Pro. This always makes me nervous, as I do not want to crack, chip, or break anything. Fortunately, the process was simple. I removed all eleven of the screws on the back cover, and within the grey ledge. The following displays the screws removed.
My first inclination was to remove the interior back-plate, which was wrong. I needed to remove the entire silver housing. I carefully separated the silver casing from the black casing, starting at the front of the laptop. I applied a plastic tool commonly used for cell phone repair to get in the crack, then carefully unsnapped each connector as I worked my way around the case. I could now access the interior, as seen in the following image.
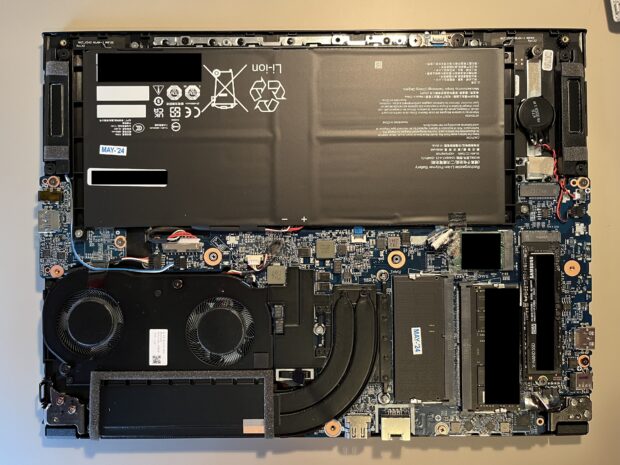
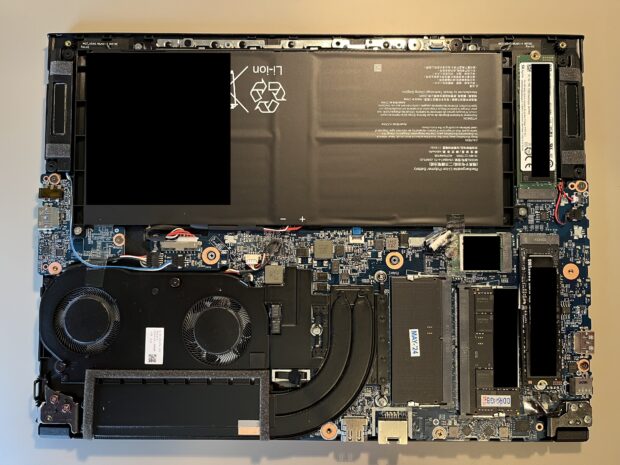
The NVMe drive is seen in the lower-right, and the second NVMe slot can be seen in the upper-right. I removed the existing drive (to make sure I did not overwrite it) and placed the new 1 TB NVMe drive in the second slot. However, both drives can be seen in the following image.
I then inserted a Pop!_OS USB installer and installed Pop!_OS to the new drive. I activated full-disk encryption as the default option. After successful installation, I replaced the original drive back in the first slot. I then booted the computer and immediately pressed "Esc" to enter the coreboot BIOS. I selected "One Time Boot" and confirmed that both drives were selectable, as seen in the following image.
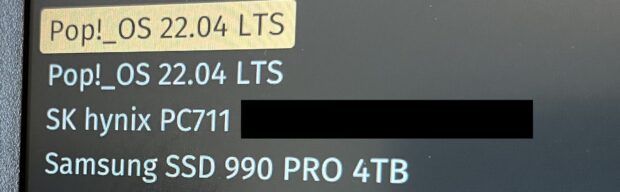
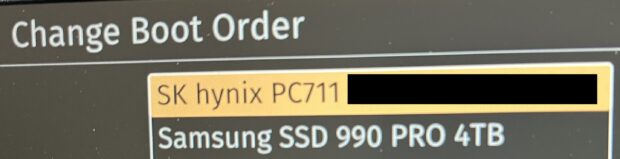
I tested booting to each and confirmed that they were unique versions of the OS within the different drives. I changed the boot process by changing the drives themselves in the boot order. I re-entered the BIOS, selected "Change Boot Order", and made the 1 TB the default boot option (in this case the SK hynix) and the 4 TB (Samsung) the secondary. The following displays my changes.
This is the drive (1 TB) which I will use as my personal machine. Whenever I want to boot to the 4 TB for breach work, I can press "Esc" upon boot and select it. My daily driver (1 TB) has a blue background (safe) while the breach data drive (4 TB) has a bright red background to remind me that I should not do anything personal within that drive. This allows me to stop carrying two laptops around while still having secure access to my data. If the laptop is lost, stolen, or seized, I have no concern about my data. Without the unique passwords I have assigned to each drive, which possess true full-disk encryption, the data is protected.
Let's think about this further. Each drive is encrypted and cannot see the other. I can completely trash my breach data drive with every known Linux virus, and know that nothing on it can touch my personal usage drive. While this is typically assumed to be the case with virtual machines as well, there are many known VM escapes which can breach the boundaries. I don't mind this when doing OSINT work in a VM on a dedicated OSINT machine, as there is minimal risk. However, I would never trust a VM to isolate malicious data while the sensitive personal host is running. Since I cannot boot both of these drives at the same time, I have no worries. This is the only real way to have complete isolation of data.
I repeated this process for a client who needed Linux as a daily driver, but also Window as an option. Specific software he needed to use is blocked within virtual machines, and he needed Windows running directly on the host. I installed Windows 11 to the second drive and activated BitLocker for the full-disk encryption. I then made the Linux drive the default for boot order, and he can reboot; press "Esc"; and select Windows whenever it is needed. Note that I had to install the Intel update program in order to fetch all of the wireless drivers. Dual booting can help ease the permanent transition from Windows to Linux. You will always know that you are a reboot away from the familiarity of Windows.
In hindsight, I should have just ordered a second drive with the machine. I would not have had to open it at all. Lesson learned, but it is great to have a laptop which I can open and modify the hardware. You can't do that with a Mac. Speaking of hardware ... The Darter Pro is the first dedicated Linux laptop I have owned which passes the one finger test. I am able to open the lid with one finger, and the rest of the body does not move. The laptop stays in place without bumping up off of the flat surface. I know that is very minor, but has always been a pet peeve of mine. My current MacBook Pro can't even do that.